


Mortars are super powerful against single housing unit ground troops but their inability to target air troops leaves then in need of a partner #cutebutcodependent


LVL1 LVL2 LVL3
LVL4 LVL5 LVL6
LVL7 LVL8 LVL9


SIZE 3x3 TILES
LVL10 MORTAR
NUMBER OF MORTARS PER TOWN HALL LEVEL
LVL1 LVL2 LVL3 LVL4 LVL5 LVL6 LVL7 LVL8 LVL9 LVL10 LVL11


- - 1 1 1 2 3 4 4 4 4

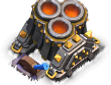
GEAR UP MULTI MORTAR
Once you level your Multi Mortar up to 4 then you can begin to use your Master Builder on your Home Village! He can "Gear Up" the Mortar on the Home Village to the "Burst" Multi Mortar. Unlike the Cannon and Archer Tower... TO BE CONT-
Geared up "Burst" Multi Mortar


LVL5 LVL6 LVL7


LVL8 LVL9 LVL10
Normal Mortar VS. Multi Mortar


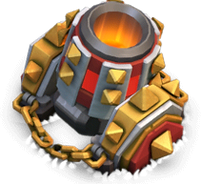
EZE'S GUIDE TO THE MORTAR
Mortars are a unique defensive weapon due to misleading power and inability to touch any troop once it get close to it. They can be tricky structures to place on your base for these reasons. Many players look up the stats of the Mortars and see that it deals very low DPS (damage per second) What is commonly overlooked it the damage per shot. Mortars take 5 full seconds to land a shell on its target, therefor the damage per second is at a X5 rate once it hits the ground. What does this mean? Death to low HP troops!
Mortars deal area Splash Damage which means that every troop within their shells blast radios will be effected by the blast of the Mortar but that's NOT all! They also deal a mild impact push-back meaning that any lower HP troop in the area of the blast that does not instantly die gets knocked back off of its target and is forced to run for 1/2 a second back to their original location. By positioning your Mortars close to one another you can initiate multiple Mortar blasts simultaneously pushing their target troops off of their building or troop which delays the attack even more. This can have devastating consequences for any attacking troops.
Mortars are often placed near the core of the village due to their long range. This also forces troops to go through several layers of walls to get to them. I would however warn you against placing them directly in the core of your base because as discussed earlier, the Mortar can not shoot targets once they get within 2 tiles of them. This means that if troops manage to wipe out the rest of your defenses and all you have left is the core.. You will be defenseless once the troops get up close. Mortars work great in combination with Air Defenses (the AD need help from the ground units and the Mortar need help with the air units because they only target ground troops.) Adding a Wizard Tower to protect the base of the Mortar is also a very popular strategy.
Mortars are very expensive to upgrade due to their ability to hit multiple targets at once with their splash dealing shell blasts. In addition to their high cost they come with an exceptionally high BASE WEIGHT.This means that there is much to consider before blindly upgrading the Mortar at the very 1st chance you get.There are 2 distinct ways that most players upgrade their base, one of which is called the .5 Method and the other method is simply called maxing out. They both have their own benefits and drawbacks so all players should have a good understanding of how each method is done and which they are going to follow. Mortars are a pivotal defense in the upgrading scheme due to their extremely high Base Weight (also called Raw or War Weight) and Value.
They are designed to one shot Archers of equal level (meaning maxed TH8 Mortars will kill maxed TH8 Archers in the 1st shot) which is a huge advantage for a defense with such a slow firing rate. This is one of the HUGE benefits of the Mortar. If an attacker just so happens to have a large horde of Archers or Goblins grouped together the Mortar can eliminate them ALL in 1 shot!
Overall the Mortar can be a flexible defense once you understand the proper placement and range of this structure. Try using then in the 4 corners of the core of your village just outside of the innermost Walls. As troops work their way to the core they will have to deal with multiple bombardments of high powered Mortar shells. Another technique used by advanced players is to place all 4 Mortars on the outside of the walls. Most attacks penetrate the walls in one location which will allow three out of 4 Mortars to rain down on troops inside the walls for the entire attack.
HERE ARE LINKS TO EVERY AVAILABLE IN-GAME ITEM AND
A FEW HELPFUL GUIDES. CLICK ON NAME TO GO TO LINK
HOME VILLAGE
ARMY
ELIXIR TROOPS
Barbarian, Archer, Giant, Goblin, Wall Breaker, Balloon, Wizard, Healer, Dragon, Pekka, Baby Dragon, Miner
Minion, Hog Rider, Valkyrie, Golem & Golemite, Witch & Skeleton, Lava Hound & Lava Pup, Bowler
Barbarian King, Archer Queen, Grand Warden
Cannon, Archer Tower, Mortar, Wizard Tower, Hidden Tesla, Air Sweeper, Bomb Tower, X-Bow, Inferno Tower, Eagle Artillery, Walls
TRAPS
Spring Trap, Bomb, Giant Bomb, Air Bomb, Seeking Air Mine
BUILDINGS
SPECIALITY BUILDINGS
Town Hall, Clan Castle, Builders Hut
ARMY BUILDINGS
Clan Castle, Laboratory, Barracks, Dark Barracks, Spell Factory, Dark Spell Factory, Army Camps, Barbarian King Altar, Archer Queen Altar, Grand Warden Altar/ Statue
RESOURCE BUILDINGS
Treasury, Gold Mines, Elixir Collector, Dark Elixir Drill, Gold Storage, Elixir Storage, Dark Elixir Storage
ARMY
Raged Barbarians, Sneaky Archers, Boxer Giants, Beta Minions, Bombers, Baby Dragons, Cannon Cart, Night Witch & Bats, Drop Ship, Super P.E.K.K.A.
Walls, Cannon, Archer Tower, Double Cannon, Hidden Tesla, Firecracker, Crusher, Guard Post, Air Bomb, Multi Mortar, Roaster, Giant Cannon, Mega Tesla
TRAPS
Push Trap, Spring Trap, Mine, Mega Mine
Star Laboratory, Army Camps, Barracks
Gem Mine, Gold Mine, Elixir Collector, Gold Storage, Elixir Storage